
The Secret Crumb
Opening the Vault to the Perfect Velvety Cheesecake...
The Ultimate Cheesecake Masterclass: How to Bake a Perfect, Crack-Free New York Classic
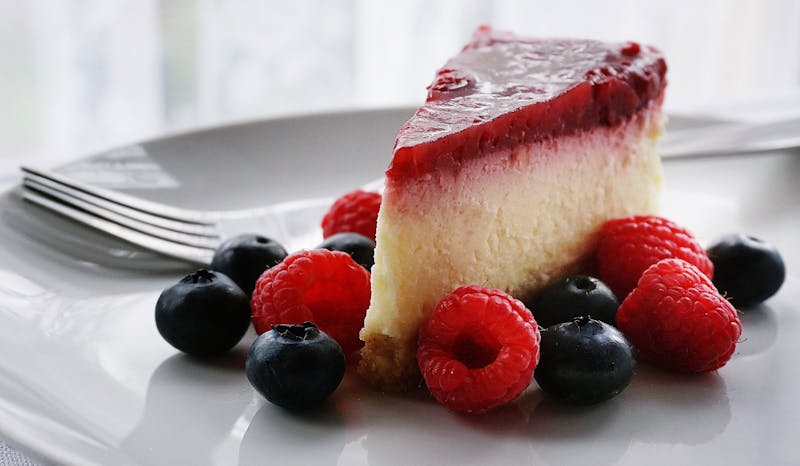
There is something completely intoxicating about the perfect slice of New York style cheesecake. When executed with precision, it stands tall, dense, and stately on the dessert plate. On your fork, it handles like pure velvet—ultra-creamy, richly decadent, and possessing a complex, tangy flavor profile that cuts cleanly through the intense sweetness of a buttery graham cracker crust. It is a show-stopping pastry masterpiece that has crowned high-end bakery displays and dessert menus around the globe for decades.
Yet, for many enthusiastic home bakers, the process of constructing a classic cheesecake feels like navigating a minefield of potential disasters. From the dreaded crater-like cracks slicing through a perfectly golden surface, to a rubbery internal texture, or a soggy, fluid-logged bottom crust caused by an unsealed water bath—the variables can feel overwhelming. Fret not, because baking an elite cheesecake is a pure structural exercise in kitchen thermodynamics and structural hydration control. In this definitive 1,000-word masterclass guide, we will unpack the fundamental science of dairy emulsion and lay down a step-by-step roadmap to baking flawless cheesecakes right in your home kitchen.
The Molecular Chemistry of Dairy Emulsion
To master the cheesecake, you must first stop treating it like a standard flour-based cake and start treating it exactly like a delicate baked custard. A premier filling consists primarily of heavy blocks of full-fat cream cheese, sugar, and whole eggs. At room temperature, cream cheese is held together by a sturdy matrix of milk fats and tightly bound proteins. If you attempt to whip these ingredients while they are cold straight out of the refrigerator, the fat clumps refuse to break apart evenly, leaving you with an uneven batter packed with stubborn, tiny dairy lumps.
Furthermore, temperature parameters control how eggs behave structurally inside the oven. As the egg proteins absorb heat, they stretch out and form a secure mesh network that traps the liquids and fats inside. If your oven temperatures skyrocket too fast, those protein fibers tighten up aggressively like a wet towel being wrung out. This force pushes the trapped moisture up to the surface in the form of steam, tearing a deep crack straight across the center of your dessert. To maintain a smooth, crack-free surface, we must manage protein expansion using slow, stable ambient temperatures.
The Master Blueprint: Raw Ingredients
- 4 blocks (900g) Full-Fat Bricked Cream Cheese (Do not use spreadable tub varieties).
- 1 cup (200g) Granulated White Sugar (Sifted fine to ease dissolution).
- 1 cup (240g) Full-Fat Sour Cream or Heavy Crème Fraîche (Adds essential acidity).
- 4 Large Whole Eggs plus 1 Large Egg Yolk (The core structural binder).
- 1 tbsp Pure Vanilla Extract and 1 tsp Fresh Lemon Juice.
- 2 cups (200g) Graham Cracker or Digestive Biscuit crumbs.
- 6 tbsp (85g) Unsalted Butter (Melted completely to anchor the crust base).
Step-by-Step Culinary Protocol
1. Engineering the Compact Crust
Preheat your oven to 350°F (175°C). Pulse your graham crackers into fine, sandy crumbs using a food processor. Pour the crumbs into a bowl and mix with the melted unsalted butter until it resembles wet beach sand. Transfer the mixture into a 9-inch heavy-duty springform pan. Use the flat bottom of a heavy measuring cup to firmly pack the crumbs across the bottom and slightly up the sides of the pan. Bake this base crust for exactly 10 minutes to set the starches, then remove it from the oven and let it cool completely on a wire rack.
2. Emulsifying the Filling Without Aeration
Reduce your oven temperature setting to 325°F (160°C). In a large mixing bowl, beat the softened cream cheese and granulated sugar on low speed for 2 minutes using a stand mixer fitted with the paddle attachment. Avoid using a whisk attachment, which whips excess air into the batter, causing it to puff up like a soufflé in the oven and collapse into deep cracks as it cools. Scraping down the sides of the bowl frequently, blend in the sour cream, vanilla extract, and lemon juice until the mixture looks uniformly glossy and completely lump-free.
With the mixer running on its lowest setting, add your eggs one at a time, mixing just until the golden yolk disappears into the batter before sliding in the next. Once the final egg is integrated, turn the mixer off immediately. Pour the glossy, heavy filling directly over your cooled crust base, then let the pan rest flat on your counter for 5 minutes to allow any remaining air bubbles to float up and pop naturally.
3. The Thermal Water Bath and Cooling Control
Because springform pans feature a two-piece design to release the cake easily, they are prone to leaking water into the crust if left unprotected. Tear off three large sheets of heavy-duty aluminum foil, lay them down in a star pattern, place your springform pan in the center, and wrap the foil tightly up the sides to form a waterproof shield. Set the wrapped pan into a large, deep roasting tray. Slide the tray onto the center rack of your oven, and carefully pour boiling water into the roasting pan until it reaches halfway up the sides of your cake pan.
Bake at 325°F (160°C) for 65 to 70 minutes. When the time is up, the outer edges of the cheesecake should look firm and matte, but the very center should still jiggle slightly like set jelly when gently shaken. Turn off your oven completely and crack the door open just a tiny sliver—about an inch—using a wooden spoon to hold it. Let the cake cool slowly inside the warm oven for one full hour. This gentle temperature step allows the delicate egg network to relax slowly, preventing structural shock and ensuring a perfectly flat surface. Transfer to the counter to cool completely, then place it in the refrigerator to chill for at least 6 hours before unlocking the springform latch.
Pro Tips for Custom Toppings and Clean Slicing
When you are ready to serve your masterpiece, avoid dragging a dull kitchen knife back and forth through the delicate cake, which will smear the edges. Instead, fill a tall glass with boiling water, dip a long, sharp chef's knife inside for 10 seconds to heat the blade, wipe it dry with a clean towel, and make one clean downward press. Wipe the blade completely clean after every single cut to maintain pristine, bakery-grade presentation slices.


0 Comments